FTK Imager
Purpose
Use FTK Imager to baseline a golden image for a target host >= Windows 10 via capturing disk images and memory dumps (not to be confused with baseline host collection via Metasponse Job Templates)
IMPORTANT: At this time of writing (23 Apr 2025), the PMO provided FTK Imager version 4.7.1* has only been successfully tested on a bare-metal Windows 10 host. It has been observed to crash VMs running Windows XP and Windows 7.
It is highly recommended to run FTK Imager multiple times in a test environment (e.g. Windows XP or 7 bare-metal) before assuming risk for mission usage
Setup
README: The PMO Appstore provided FTK Imager named AccessData_FTK_Imager_*.exe is a bundled .exe containing the actual FTK Imager.exe and .dll dependencies, and an .msi installer when executed.
Given this context, the Setup section is specifically for getting the actual FTK Imager.exe and .dll dependencies onto an external/secondary disk device for usage as a pseudo "live USB"; to avoid install on a target Windows host.
If you already have FTK Imager.exe readily available for use, proceed to the Execution section for actual forensic image/memory collection steps.
-
Acquire an external/secondary disk device (i.e. external HDD) for mission usage. For learning purposes, you may skip this step.
-
Follow the MIP Quick-Setup SOP to setup and/or verify a usable Windows 10 VM.
-
Follow the File Shares Setup SOP to connect and/or verify access to the DIP Fileserver SMB share
/cvah/appstorea.k.a. the Appstore -
Copy the FTK Imager installer onto the MIP Windows 10 VM.
-
Run the FTK Imager installer
.exeon the MIP Windows 10 VM,- For the install destination path, it can be on either Windows 10 VM itself or an external/secondary disk device. Overall, copy or take note of the install destination path for the next step.
-
Navigate to the FTK Imager install destination path, and copy all the files onto an external/secondary disk device for mission usage. For learning purposes, you may skip this step. Files will include:
FTK Imager.exeactual*.dlldependencies
If all steps are completed correctly, you successfully provisioned a readily available FTK Imager.exe and its *.dlls ready for Execution
Execution
Use the Execution section to generate a memory dump (i.e. capture physical and/or virtual RAM) and disk image of a target Windows host.
IMPORTANT: You must run FTK Imager.exe as an Administrator user account, or you might hit errors enumerating privileged files or image system partitions. In addition, the program may also crash.
This documentation was written for assumed mission usage.
For learning purposes, if FTK Imager was installed on the Windows 10 VM, feel free to use the MIP internal/primary disk device (instead of an external/secondary disk device) for file storage of FTK Imager output files.
Memory Dump
IMPORTANT: For target host baseline purposes, perform Memory Dump first before starting Disk Image steps.
-
Run
FTK Imager.exeas an Administrator -
Create a new folder designated for Memory Dump artifacts on the external/secondary disk device containing
FTK Imager.exe. -
File > Capture Memory
-
In the
Memory Capturewindow:- Destination path:
- Click
Browse - Navigate to the created Memory Dump destination folder to save memory dump (i.e. the external/secondary storage disk)
- Click
- Destination filename
- Rename
memdump.memto unique filename (e.g.20250421_callsign_win10_memdump.mem)
- Rename
- Tick
Include pagefile- Rename
pagefile.systo unique filename (e.g.20250421_callsign_win10_pagefile.sys)
- Rename
- Tick
Create AD1 file- Rename
memcapture.ad1to unique filename (e.g.20250421_callsign_win10_memcapture.ad1)
- Rename
tipMemory Capture steps, if followed verbatim, will generate the following files:
*.mem: Actual raw memory dump, usage for Volatility analysis*.ad1: "AccessData Custom Content Image" file format, usage exclusively for memory analysis through FTK Imager, also useful for chain-of-custody (e.g. file hashes, case metadata)*pagefile.sys: Windows virtual memory (swap file) for manual analysis
- Destination path:
-
(Optional) Compress/zip the Memory Dump folder (in case of saving disk space on the external/secondary disk). For context, if the target Windows host has 64GB RAM, the generated
*.memfile size will be 64GB.
Disk Image
Source Evidence Type
Use this table only as reference in case of understanding how to create different Disk Image > Source Evidence Types supported by FTK Imager
| Source Type | Captures | Output File Extension(s) | Use Case |
|---|---|---|---|
| Physical Drive | Entire disk (all sectors: used, unused, deleted) | .e01, .dd, .img | Full forensic imaging, deleted file recovery, slack space analysis. Can be converted to .vmdk for full VM usage. |
| Logical Drive | One volume (just active file system) | .e01, .AD1 | Triage, live file capture, no unallocated/deleted data |
| Image File | Opens a previously captured image | — | Review or extract data from existing forensic image |
| Folder | Only contents of a folder/directory | .AD1 | Collect specific user files (e.g., Documents folder), light triage |
Physical Drive > E01
ALCON: For typical forensic acquisition workflows, Source Evidence Type Physical Drive and .e01 EnCase file extension format is the preferred method.
By performing this workflow, you have the benefit of:
- Compression (i.e. smaller file size)
- Faster image capture vs. raw (
.dd) - EnCase metadata (e.g. file hashes)
Given this context, the following Physical Drive > E01 steps will only demonstrate this specific workflow scenario (and not raw .dd).
- Run
FTK Imager.exeas an Administrator - File > Create Disk Image
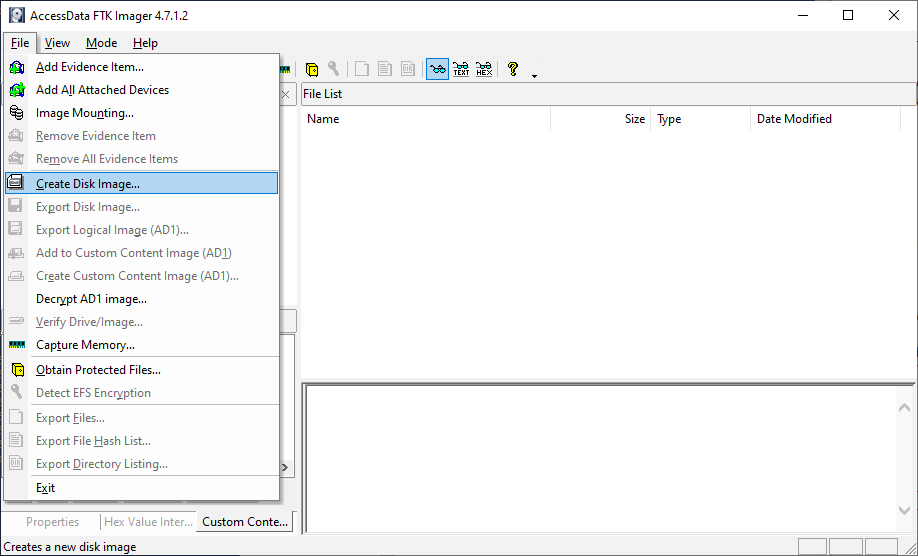
-
In the
Select Sourcewindow > SelectPhysical Driveas Source Evidence Type -
In the
Select Drivewindow:- Open the dropdown for
Please select from the following available drives: - Select the target
\\.\PHYSICALDRIVEdrive device that you will be creating a forensic image of. Do not select your own external storage device. - Click
Finish
- Open the dropdown for
-
In the
Create Imagewindow:- (Optional) Under
Image Destination(s)> ClickAdd> SelectE01for Destination Image Type > ClickNext- In the event FTK Imager automatically added the image destination, proceed to the next step.
- In the
Evidence Item Informationwindow, fill out the following optional fields (for tracking and chain of custody purposes):- Case Number
- Evidence Number
- Unique Description
- Examiner
- Notes
- (Optional) Under

-
In the
Select Image Destinationwindow:- For
Image Destination Folder- Click
Browse - Select the destination folder for the image
- Click
tipUse the external/secondary storage disk containing
FTK Imager.exeto store the projected forensic image artifact (i.e. create a new folder on this drive, and select that new folder as the destination path)- For
Image Filename (Excluding Extension)- Use a meaningful filename without the extension (e.g.
20250421_callsign_win10). FTK Imager will automatically append.e01to this file.
- Use a meaningful filename without the extension (e.g.
- Image Fragment Size (MB)
0for a single.e01file; Useful for modern hosts (e.g. NTFS with 8GB RAM), faster, harder to transfer over the network1500(default) for splitting the image across multiple.e01, e02, ...files 1500 MB each; Common choice with older hosts (e.g. FAT32 with 4GB RAM), slower, easier to transfer over the network
- Compression
6Default setting. Good CPU balance.0Useful for older hosts; Less CPU intensive9Useful for modern hosts; More CPU intensive
- Use AD Encryption
- If ticked, provides file encryption, will require you set password/certificate authentication for encryption/decryption
- For
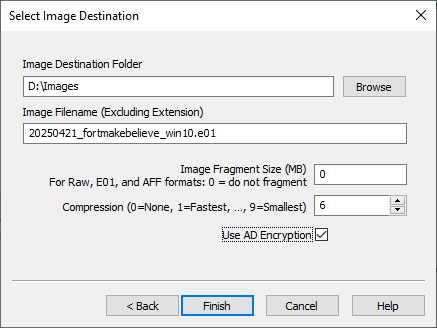
- In the
Create Imagewindow:
- Image Destination
- Click
Add - Navigate to destination filepath to save
.e01
- Click
- Tick
Verify images after they are createdto ensure file is not corrupted after capture - Tick
Precalculate Progress Statisticsto get estimate for image capture completion
Example Output:
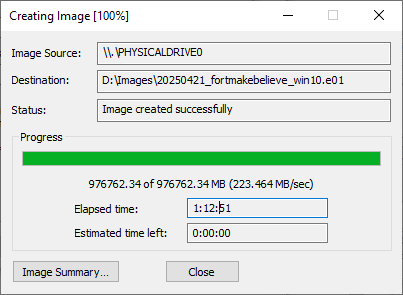
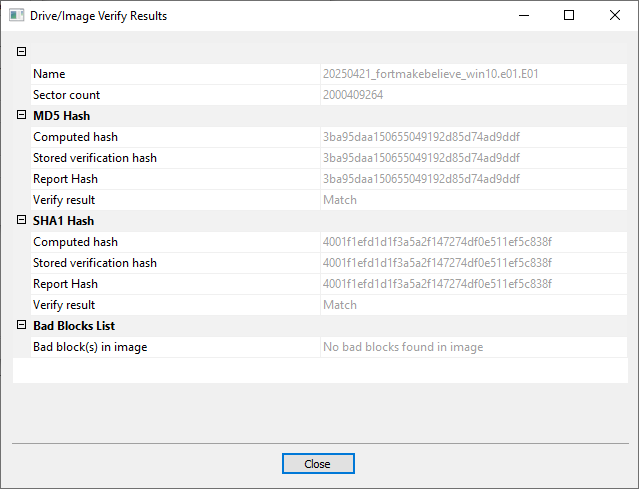
Cleanup
As of this writing, the PMO Appstore provided FTK Imager.exe will generate artifacts on the target host system, even if executed from an external/secondary disk device. Use this section as guidance to facilitate some cleanup.
Cleanup section is not a fully comprehensive list, but will clear out most artifacts generated by when running FTK Imager.exe
Given the explicit approval by MEL/CL:
- Run
cmdas an administrator for the following steps below to minimize console logging (if necessary). - If
powershellas an administrator is required, this guidance will explicity state it. Any steps written for PowerShell assumes you are usingPSVersion>=5.1(verify by running$PSVersionTablein PowerShell)
If "powershell run as an administrator" is a go by MEL/CL, feel free to perform all the steps below with this.
Prefetch
# Navigate to Prefetch directory
cd C:\Windows\Prefetch
# Check for any Prefetch files associated with our FTK Imager instance
dir | findstr /I FTK
# Delete any Prefetch files containing string "FTK"
del *FTK*
# Double-check any Prefetch files associated with our FTK imager instance is deleted
dir | findstr /I FTK
Recent Files / Jump Lists
# Recent Files (Removes shortcuts in Quick Access)
del /f /q "%APPDATA%\Microsoft\Windows\Recent\*"
# Jump lists (Removes app-specific "Recent" files)
del /f /q "%APPDATA%\Microsoft\Windows\Recent\AutomaticDestinations\*"
Registry
Removing all RunMRU and UserAssist has no adverse effects on a live system, but will clear out other entries and temporarily affect user experience (e.g. if a user runs notepad a lot, these entries are populated on RunMRU and UserAssist)
Remove these at the discretion of your MEL/CL.
## Run MRU ("Run Most Reecently Used"; Run box history)
reg delete "HKCU\Software\Microsoft\Windows\CurrentVersion\Explorer\RunMRU" /f

## UserAssist (GUI usage tracking)
reg delete "HKCU\Software\Microsoft\Windows\CurrentVersion\Explorer\UserAssist" /f
Virtualization
Use this section to convert an FTK Image forensic image (e.g. .e01) to a bootable VMDK image to use with VMWare Workstation.
Convert E0* > RAW > VMDK
Setup
- Setup SANS SIFT VM on VMWare Workstation; the image is pulled from the
/cvah/appstoreSMB share. Follow the File Shares SOP if you need the SIFT image. Otherwise, proceed to the next step.
Given that the .e0* files are accessible somewhere on the MIP, you may need to make it accessible to the SIFT VM via various methods. Methods include:
- SMB Share
- VMWare Workstation Share Folder
- Identify EnCase version of your target
.e01file
ewfinfo image.e01
- List supported input formats for
ewfexportto confirm the EnCase version identified from the previous step is supported
ewfexport -h
##<SNIP>encase6
- Assign environment variable for identified EnCase version to be used in E0* > RAW > VMDK
ENCASE_VERSION="encase6"
echo $ENCASE_VERSION # Test
Convert
- Convert single
.e01or mulitiple.e0*files to RAW
ewfexport -f $ENCASE_VERSION -t raw -o image.raw -i 1 image.E01
-t raw: Output format-f $ENCASE_VERSION: Input in this example isencase6- -
i 1: Start at image segment 1 (the .E01 file) image.E01: Points to the first segment — it auto-detects the rest (if any)
- Convert RAW to VMDK
qemu-img convert -f raw -O vmdk image.raw image.vmdk
-f raw: Specifies input format of source image (i.e. we haveimage.rawfrom the previous step)-O vmdk: Specifies output format of destination image (i.e. we wantimage.vmdk)image.raw: The source disk image fileimage.vmdk: The destination filename
If all steps are completed correctly, you successfully completed Convert E0* > RAW > VMDK and have a readily bootable .vmdk image for VMWare Workstation usage.
VMWare Workstation Share Folder
Use this section as guidance to share the following from the MIP RHEL to a target VM (e.g. Win10, SIFT):
- Internal/primary disk device (e.g. FTK Imager evidence files directly on MIP RHEL host)
- External/secondary disk device (e.g. FTK Imager evidence files on an external HDD)
MIP RHEL Share Folder > Target VM
Follow these steps if you want to map a share folder from the MIP internal/primary disk device to the target VM (e.g. evidence files already on MIP RHEL)
For an example scenario, on the RHEL host we have a /home/assessor/Desktop/evidence path to be named evidence, containing our copied forensic evidence files we want to share with the VM.
- Open VMWare Workstation
- VM > Settings
- Options > Shared Folder
- Folder Sharing:
Always enabled - Folders > Add > Add a Shared Folder
- Name:
evidence(change me) - Host Path:
/home/assessor/Desktop/evidence(change me) - Attributes:
- Tick
Enabled - Tick
Read-only
- Tick
- Name:
- Folder Sharing:
Enforce Read-only on a forensic evidence shared folder to maintain data integrity of copied evidence files. It is recommended in case you accidentally modify/delete the original evidence files.
For a separate MIP RHEL writable shared folder, repro the steps above to map to that folder instead.
To enable FTKimager running on VMWare Windows Host to see the shared folders you must run the following command:
net use <assigned drive letter> "/vmware-host/shared folders"
SIFT VM
Use the following command below to manually mount VMWare Workstation Share Folder(s) if not already mounted:
For an example scenario, on the SIFT VM we have /mnt/hgfs/evidence path ready for mount after following steps from MIP RHEL Share Folder > Target VM
# 0. Confirm Shared Folders first if the files are already being shared. If not, proceed to next steps.
sudo ls -la /mnt/hgfs

# 1. Check VMWare Tools installed on Linux VM
vmware-toolbox-cmd -v

# 2a. Mount ALL VMWare Workstation Shared Folders
sudo mount -t fuse.vmhgfs-fuse .host:/ /mnt/hgfs -o allow_other

# 2b. Mount SINGLE VMWare Workstation Shared Folder
SHARE_DIR="evidence"
sudo mount -t fuse.vmhgfs-fuse .host:/$SHARE_DIR /mnt/hgfs/$SHARE_DIR -o allow_other

# Example Output
sansforensics@siftworkstation: /mnt/hgfs/cvah
$ ll
total 32
drwxrwx--- 1 sansforensics sansforensics    94 Apr  8 21:03 ./
dr-xr-xr-x 1 root          root           4192 Apr 29 16:37 ../
drwxr-xr-x 1 sansforensics root          24576 Mar 21 20:04 appstore/
drwxrwx--- 1 sansforensics sansforensics     6 Apr  8 20:47 dat/
drwxrwx--- 1 sansforensics sansforensics    33 Apr  8 20:47 data/
drwxr-xr-x 1 sansforensics          1001    54 Apr  8 16:02 git/
drwxrwx--- 1 sansforensics sansforensics    65 Apr  8 20:48 scripts/
drwxr-xr-x 1 sansforensics          1001    20 Apr 28 19:22 share/
drwxrwx--- 1 sansforensics          1001    31 Apr  8 16:07 vm/

sansforensics@siftworkstation: /mnt/hgfs/evidence
$ ll
<SNIP>
External/Secondary Disk Device > Target VM
Follow these steps if you need the VM to directly connect to a external/secondary disk device (i.e. USB connnected NTFS formatted external/secondary hard drive)
- Open VMWare Workstation
- VM > Settings
- Hardware > USB Controller > USB Compatibility >
USB 3.1
In case of forensic evidence files, enforce chain-of-custody best practices by:
- Copying files over to the target VM, then safely disconnecting the external/secondary disk device
- AND/OR Copying files to the MIP RHEL host itself and follow MIP RHEL Share Folder > VM (Recommended)