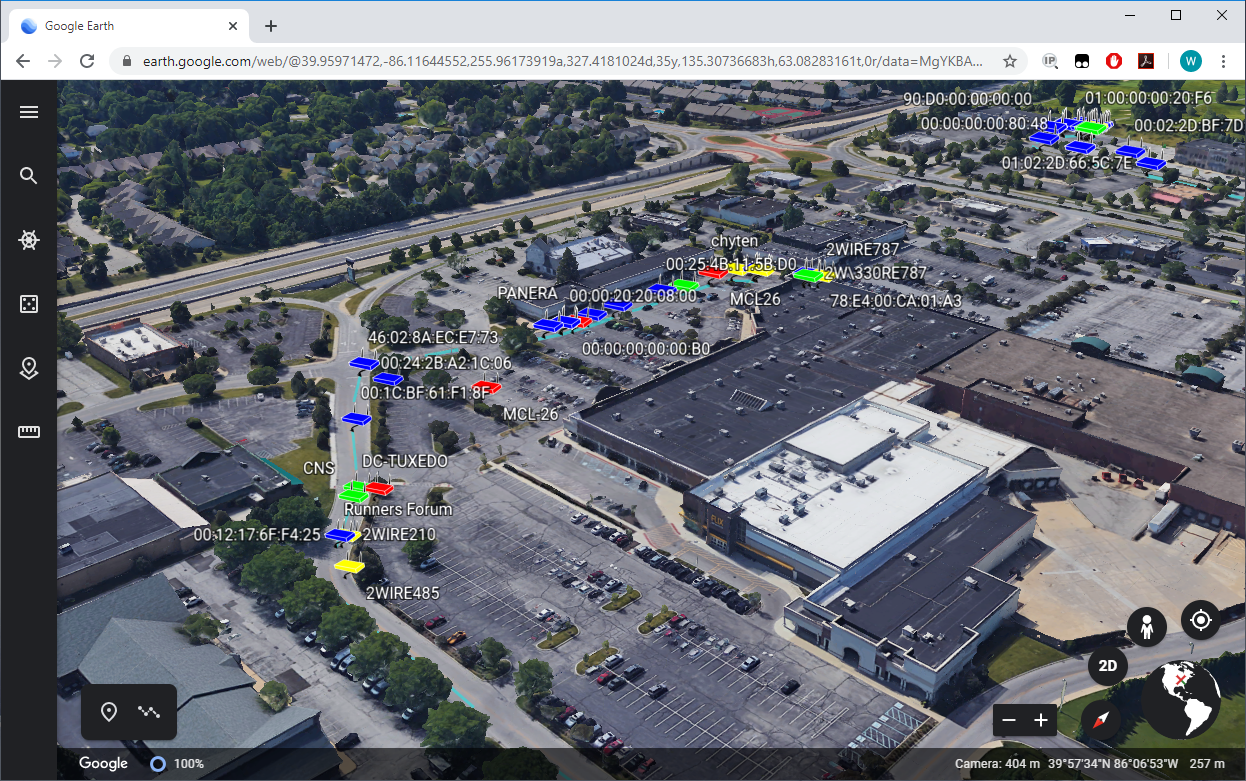
Analysis
The Kismet service will produces a .kismet file every time it is started. The most recently created file will correspond to your most recent Kismet session:
sudo ls -atr /var/log/kismet/*kismet
Extract PCAP data
Extract PCAP data from the Kismet SQLite database file (.kismet) so that it can be analyzed in other tools, such as Wireshark:
sudo kismetdb_to_pcap --in /var/log/kismet/<FILENAME>.kismet --out results.pcap
Analyze SSID data
Convert Kismet data to a list of SSIDs
Convert the Kismet SQLite database file (.kismet) to a CSV list of access points (BSSID,SSID,Capabilities):
sudo kismetdb_to_wiglecsv --in /var/log/kismet/<FILENAME>.kismet --out - | tail -n+2 | awk -F',' '{print $1 "," $2 "," $3}' | sort -r | uniq > ssids.csv
Analyze location data
1. Convert Kismet device location data into a Google Earth readable file
Convert the Kismet SQLite database file (.kismet) to a .KML file:
sudo kismetdb_to_kml --in /var/log/kismet/<FILENAME>.kismet --out results.kml
To generate a .kml file for a specific SSID or BSSID only, you must filter the .kismet database before running kismetdb_to_kml.
The kismetdb_to_kml tool does not support filtering directly, but you can use sqlite3 to remove unwanted entries.
Example: Filter by BSSID, where 00:11:22:33:44:55 is the only BSSID you want
cp /var/log/kismet/<FILENAME>.kismet filtered.kismet
sqlite3 filtered.kismet "DELETE FROM devices WHERE base_mac != '00:11:22:33:44:55';"
kismetdb_to_kml --in filtered.kismet --out results_filtered.kml
Example: Filter by SSID, where CorpNet is the only SSID you want
cp /var/log/kismet/<FILENAME>.kismet filtered.kismet
sqlite3 filtered.kismet "DELETE FROM devices WHERE ssid != 'CorpNet';"
kismetdb_to_kml --in filtered.kismet --out results_filtered.kml
Example: Filter by multiple SSIDs using IN (...)
cp /var/log/kismet/<FILENAME>.kismet filtered.kismet
sqlite3 filtered.kismet "DELETE FROM devices WHERE ssid NOT IN ('CorpNet','CorpNet-Guest');"
kismetdb_to_kml --in filtered.kismet --out results_filtered.kml
2. Convert Kismet signal strength data to a heatmap (EXPERIMENTAL)
-
Convert the Kismet SQLite database file (
.kismet) to a CSV of signal strength and locaton data:sudo kismetdb_to_wiglecsv --in /var/log/kismet/<FILENAME>.kismet --out - \
| awk -F',' '
NR==1 { next } NR==2 { next } # Skip headers
$6 != "" && $7 != "" && $8 != "" {
key = $7 "," $8; # lat,lon
if (!(key in max) || $6 > max[key]) {
max[key] = $6;
}
}
END {
print "lat,lon,signal_dbm,weight,radius";
for (k in max) {
dbm = max[k];
weight = -1 * dbm;
radius = 100 * (10 ^ ((dbm + 30) / -20));
if (radius > 100) radius = 100;
split(k, coords, ",");
print coords[1]","coords[2]","dbm","weight","radius;
}
}' > heatmap_weighted.csvtipTo generate a heatmap for a specific SSID or BSSID only, you can filter the CSV output using
awkbefore generating the heatmap.The following fields are used for filtering:
$2= SSID (e.g.,CorpNet)$1= BSSID (e.g.,00:11:22:33:44:55)
Example: Filter by BSSID, where
00:11:22:33:44:55is the only BSSID you want:sudo kismetdb_to_wiglecsv --in /var/log/kismet/<FILENAME>.kismet --out - \
| awk -F',' 'NR==1 {print "bssid,signal_dbm,lat,lon,weight"; next} \
$1 == "00:11:22:33:44:55" && $6 != "" && $7 != "" && $8 != "" \
{print $1","$6","$7","$8","-1*$6}' > heatmap_weighted.csvExample: Filter by SSID, where
CorpNetis the only SSID you want:sudo kismetdb_to_wiglecsv --in /var/log/kismet/<FILENAME>.kismet --out - \
| awk -F',' 'NR==1 {print "bssid,signal_dbm,lat,lon,weight"; next} \
$2 == "CorpNet" && $6 != "" && $7 != "" && $8 != "" \
{print $1","$6","$7","$8","-1*$6}' > heatmap_weighted.csvExample: Filter by multiple SSIDs:
sudo kismetdb_to_wiglecsv --in /var/log/kismet/<FILENAME>.kismet --out - \
| awk -F',' 'NR==1 {print "bssid,signal_dbm,lat,lon,weight"; next} \
($2 == "CorpNet" || $2 == "CorpNet-Guest") && \
$6 != "" && $7 != "" && $8 != "" \
{print $1","$6","$7","$8","-1*$6}' > heatmap_weighted.csv -
Pre-convert to Layer using
ogr2ogr, then generate a heatmap GeoTIFF usingqgis_process, and finally convert the GeoTIFF to KML overlay usinggdal_translate:# Step 1: Convert CSV to GeoJSON in projected coordinates
ogr2ogr -f GeoJSON heatmap_weighted.geojson heatmap_weighted.csv \
-oo X_POSSIBLE_NAMES=lon -oo Y_POSSIBLE_NAMES=lat \
-oo AUTODETECT_TYPE=YES -oo KEEP_GEOM_COLUMNS=NO \
-s_srs EPSG:4326 -t_srs EPSG:3857
# Step 2: Generate raw GeoTIFF via QGIS (already done)
QT_QPA_PLATFORM=offscreen qgis_process run qgis:heatmapkerneldensityestimation \
-- INPUT="$(pwd)/heatmap_weighted.geojson" \
RADIUS=0 RADIUS_FIELD="radius" WEIGHT_FIELD="weight" \
KERNEL=0 OUTPUT_VALUE=0 OUTPUT="$(pwd)/heatmap_raw.tif"
# Step 3: Apply a color ramp with transparency using GDAL
gdaldem color-relief heatmap_raw.tif /dev/stdin heatmap_color.tif <<EOF
0 255 0 0 255
50 255 255 0 255
100 0 255 0 0
nv 0 0 0 0
EOF
# Step 4: Warp to ensure alpha channel is properly embedded
gdalwarp -dstalpha -of GTiff heatmap_color.tif heatmap_alpha.tif
# Step 5: Convert to Google Earth format with transparency
gdal_translate -of KMLSUPEROVERLAY \
-co FORMAT=PNG \
-co NAME="Signal Strength Heatmap" \
heatmap_alpha.tif heatmap.kmz
Viewing data in Google Earth Desktop/Pro
Offline Method
It is best to cache the map data of the area that you will be war-driving in Google Earth Desktop by simply zooming into the area while online so that the map is available while offline. The Google Earth Desktop/Pro map cache is limited to 2048mb.
-
Open the Google Earth program
-
Click:
File -> Import…and select theresults.kmlfile for import -
The map should zoom in to the general area that the WiFi SSIDs were detected
Online Method
-
Transfer the
.kmlfile to an internet capable machine -
In a web browser (preferably Chrome) navigate to https://earth.google.com/
-
On the left, click Projects
-
Click the New Project button
-
Click:
Open -> Import KML file from computer -
Select the
results.kmlfile that you want to view